Increased output from laser welding systems drives this need
WOUTER M. ZWEERS
Laser welding has become more popular in automotive body-in-white and component production because it is highly productive—a single laser welding robot can replace up to five conventional spot welding robots. High-power disk or fiber lasers, combined with a scanner welding head and an industrial robot for on-the-fly laser welding, can produce more than one hundred welds per minute.
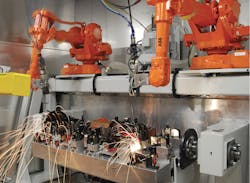
This causes a challenge: if the production is so high, how can one ensure that stable, good-quality welds are produced? Often, crash safety-relevant parts are produced in the automotive industry, making weld quality even more important. AWL-Techniek, as a specialized machine builder, supports its customers in tackling this challenge (FIGURE 1).
FIGURE 1. AWL-Techniek's laser welding machine. (Courtesy: AWL-Techniek)
This article will discuss the three aspects of a stable production machine: the machine itself, the limits of quality control by a human inspector, and automatic quality inspection.
The laser welding machine
Quality starts in the welding machine. The laser welding fixture must be able to clamp the parts in a stable manner even if the tolerances are rough, as is often the case in stamped metal parts.
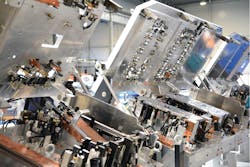
The fixture must also be able to prevent errors by the operator. A good laser welding fixture detects if all single parts are loaded correctly before the laser welding process can be started. Poka yoke systems (a Japanese development of any mechanism in a lean manufacturing process that helps an equipment operator avoid [yokeru] mistakes [poka]), product detection sensors, and a well-designed tolerance chain are needed. Attention must be paid to clean air supply and fume exhaust, and the fixture must be easy to clean and to service (FIGURE 2).
FIGURE 2. Fixtures for car seats optimized for high-quality laser welding are shown. (Courtesy: AWL-Techniek)
AWL-Techniek has developed specific robot software to make industrial robots more accurate. Using this software enables production of edge welds without a seam tracking system. This software is an essential tool for curved welds where high accuracy is needed—for example, in circular edge welds. These examples show that designing and building laser welding fixtures and laser welding machines is a complicated task that requires great skills and experience.
Human visual vs. automatic inspection
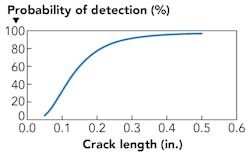
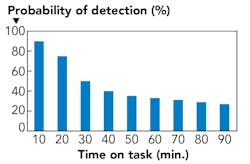
For the weld quality control system, some people argue that an operator can easily do a visual quality check while he or she is handling the parts. That's not necessarily true—research from the aviation industry shows that for a quality control task, inspectors miss small defects easily and after only one hour on the job, they miss almost 70% of defects (FIGURES 3 and 4).
FIGURE 3. In human visual inspection of welds, small defects are easily missed [1].
FIGURE 4. The error detection rate of human inspectors falls strongly over time [1].
It is clear that visual evaluation by a human inspector is not reliable, so an alternative solution is an automatic quality inspection system. Different systems are on the market and AWL-Techniek has installed numerous systems for customers.
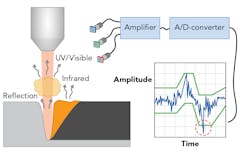
Many popular systems are based on monitoring the process light from the laser weld process. In these systems, light from the welding process is observed by one or several photodiodes. The quality monitoring system compares the measurements of the signal of the photodiodes to the signal of a known good weld. If the measurement is similar, the system decides that the weld is good. If the signal is different, the system concludes that the weld was not good (FIGURE 5).
FIGURE 5. This schematic illustrates the principle of photodiode-based laser quality monitoring [2].
Diode-based systems have the advantage of being quick and automatic. They evaluate weld quality during the actual welding, so no extra inspection station is needed in the production line. Of course, this is only valid if the system is reliable.
However, a disadvantage of diode-based systems is that they measure indirectly. The diode measures the process light, which is correlated to the weld quality—but is not the actual weld quality. This leads to errors that are not detected (false-negatives) and to good welds that are detected as errors (false-positives). AWL-Techniek experiments showed that the reliability of the diode-based automatic systems was not perfect, but when the error rate of automatic quality monitoring systems was compared to human visual inspection, it was clear that a well-adjusted automatic system performs significantly better.
It is important to realize that quality monitoring systems will need adjusting and fine-tuning not just at installation, but especially during full-scale production. A fine balance between sensitivity (no true errors missed) and no false-positive errors must be found. It is important to educate the maintenance team working with the installation so that they feel comfortable in performing these optimizations. Therefore, strong support and understanding by the factory management is needed.
Error handling strategy
A challenge is to design a good error handling strategy that includes how to handle false-positives. A typical part can have several hundreds of welds. Therefore, even a low percentage of false-positives for a single weld can lead to a considerable number of positives for a complete part.
It is important to make rules for the part quality—for example, a rule that a defined percentage of welds can be defective before the part must be sorted out. A statistical analysis of the results, during production and fine-tuning the system, can be helpful. If the error handling strategy is not sufficiently robust, the user will not be satisfied with the quality control system.
Outlook
For the future, more reliable systems are expected on the market. An emerging trend—with several systems being brought to market—is optical coherence tomography (OCT), where the actual depth of a laser weld, as well as the profile of the surface, is measured. This enables direct evaluation of the features of a laser weld and thus promises more reliability. An ultimate step would be to use this measurement signal as an input for feedback control of the laser welding process. A further possibility is to use a laser triangulation-based system, which checks the quality of the surface of the weld. These systems are especially appropriate for edge welds.
Clearly, quality monitoring in laser welding is a theme that has grown more important over recent years, as output from laser welding machines has increased. Quality monitoring is not without challenges, but commercially available monitoring systems can be a great help.
Popular systems that are available are not plug-and-play. Optimization and fine-tuning during production are necessary, as well as training for the maintenance staff in doing this optimization. A robust quality strategy must be designed, which does take into account the reliability of the monitoring system as well as the danger of false-positive errors.
REFERENCES
1. C. G. Drury and J. Watson, "Good practices in visual inspection," FAA/Human Factors in Aviation Maintenance (2002); see https://goo.gl/w2X5qN.
2. M. Schmidt, "Process monitoring for laser materials processing - standstill or progress," Proc. EALA, Bad Nauheim, Germany (2014).
3. W. M. Zweers, "Process control in industrial applications," Proc. AKL'16, Aachen, Germany (2016).
WOUTER M. ZWEERS ([email protected]) is technology manager for AWL-Techniek, Harderwijk, Netherlands; www.awl.nl.

