NATALIYA DEYNEKA DUPRIEZ
Better-quality welds, reduced cost per part, and shorter cycle times are industrial goals that can be achieved by using highly focused laser light. Precise and reliable dynamic sensing technology is required to operate the automated processing laser without direct human manipulation to accomplish safety requirements.
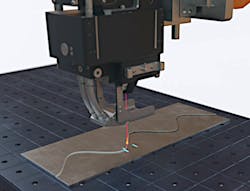
Today, optical coherence tomography (OCT) has gained acceptance as a measurement technique with high precision and reproducibility. OCT as applied to laser welding has already made a step beyond laboratory use, being widely adapted to various laser heads in different branches of the joining industry. OCT brings laser welding to its proper target, ensuring high-quality welds and enabling the reduction of cycle times during welding along sophisticated trajectories or during positioning at challenging joints or low-dimensional e-mobility elements. OCT is beneficial for online omnidirectional seam tracking (FIGURE 1), exact nondestructive measurement of keyhole depth, and identification of faults and defects at the resulting seam. Automotive companies are now increasingly using OCT in their manufacturing processes.
OCT, together with laser welding, is facing extensive new challenges in the e-mobility and aerospace industry, meeting the demands in welding of electric propulsion unit components. Electric vehicles and flying cars are among the greatest technological trends of the next decade, even though the history of e-mobility goes back over 100 years.
The era of electric vehicles started in the 19th century, a time of many fundamental electrical discoveries. At that time, the first electric motors and vehicles were invented independently at different countries in the world. “Electromobiles” were the earliest automobiles—quieter, more comfortable, more environmentally-friendly, and easier to operate and maintain compared to gasoline cars of the time. However, storage battery limitations, the discovery of petroleum reserves, and so on caused the decline in development of electric cars. In addition, cheaper assembly lines for internal combustion engine cars developed by Henry Ford brought petroleum-based transportation into dominance for more than a century. In 1940, Henry Ford made a visionary statement: “Mark my words—a combination of airplane and motor car is coming.”
Today in the 21st century, due to toxic air pollution, electric cars are again gaining popularity and flying cars are no longer science fiction. Technological progress has caused a resurgence in electric individual transportation and is making individual air travel feasible.
Electrification of cars and aircrafts, with an aim to considerably lower emissions and noise, is placing even higher requirements on laser processing. Welding has to be faster, more precise, and more efficient. “Closed-loop or ‘near-closed’ loop process control will be an absolute necessity for guaranteeing the quality of these processes when producing electrical systems with ultra-high reliability,” according to one source.1 This can be accomplished by using OCT for real-time pre-, in-, and post-process control when performing seam tracking, measuring keyhole depth, and acquiring seam quality to obtain lightweight and extremely solid construction.
OCT for welding hairpins
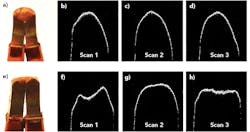
The rapidly growing e-mobility market requires precisely welded functional components. Laser welding, together with precision sensing systems like OCT, make a great contribution to the development of vehicles powered by electric batteries—the joining of components for body-in-white lightweight designs,2 where precise seam tracking is required, or components for the motors and batteries. Welding of e-powertrain hairpins (FIGURE 2a) is one of them. Copper wires (hairpins) for electric drive stators must be welded very rapidly, without pores and spatters, to ensure good electrical contact. The high electrical and thermal conductivity and reflectivity of copper presents a welding challenge, as the processing laser beam must meet the hairpin’s surface in its focus. For this purpose, OCT rapidly scans along three lines (FIGURE 2b), identifying gap locations between the pins (FIGURE 2c) and the pins’ misalignment to each other (FIGURE 2d). The exact height of each pin, which is crucial for the adjustment of the focus and power of the processing beam, is not a problem for the height-sensing OCT system. The overall measurement time is approximately 10 ms.Real-time inspection of seam surface porosity
Micrometer resolution of OCT can be utilized to inspect surface porosity during industrial laser welding. TRUMPF’s PFO33 welding head with a focal length of 345 mm is equipped with a Lessmüller Lasertechnik OCT system to provide robust and fast online quality inspection. The scanner optics follows the circular seam (circle diameter of 16 to 33 mm) with a velocity of 5 to 6 m/min, resulting in a cycle time <1.5 s. OCT simultaneously scans perpendicular to the welding direction slightly behind the processing laser beam, acquiring 3D surface images (FIGURE 4a). By using OCT data, the entire seam topography is reconstructed and stored for part tracking issues (FIGURE 4b). Accurate quantitative evaluation of the weld area with OCT enables recorded defects such as open pores (FIGURE 4c). This permits eliminating subsequent quality-control efforts to ensure sufficient weld quality, even during very short cycles.Reliable keyhole depth measurement
One of the most important factors related directly to the weld quality and revealed in-process is the depth of the vapor capillary (keyhole) in deep penetration welding. OCT is a proven technology enabling welding of the workpiece with simultaneous measurement of the keyhole depth coaxially to the processing laser in a nondestructive manner.
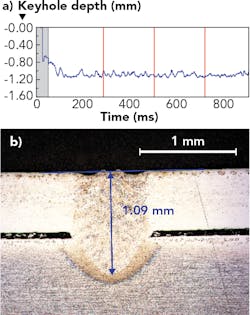
Zinc-coated steel sheets (DX56+Z100 ThyssenKrupp Steel) were joined by overlap seam welding with OCT measuring at the acquisition rate of 70 kHz. The thicknesses of the upper and bottom sheets were 0.65 mm and 2.00 mm, respectively, with a 0.1 mm gap for degassing. Twenty identical welds (FIGURE 5a) were produced at a welding speed of 4.0 m/min. Welding was accomplished with an IPG Photonics fiber laser having a core diameter of 100 µm and a laser power of 1.6 kW. IntelliWELD PS scanner optics with an image ratio of 1:6 were used, resulting in a laser spot size at the workpiece surface of approximately 600 µm. The processing and measuring beams were focused underneath the workpiece surface—that is, inside the material. The weld depth was determined as a height difference between the reference point and the keyhole bottom. For the reference measurement, the OCT beam was pointed to the surface slightly ahead the process. FIGURE 5b shows that the weld depth fluctuates within a short range, indicating a stable welding process.To correlate the OCT-measured and the cross-section depth, three transverse cross-sections were made on each weld (FIGURE 5b). A clear weld borderline is visible on the cross-sectional image. Its lowest point is considered as a real weld depth.
Comparing the OCT results with metallographic transversal cross-sections shows a good agreement between the measurements. The average difference between the OCT in-process and microscopic measurements is 0.04 mm, or 9%, which is comparable to those presented elsewhere for mild steel using the same laser power range and welding velocity.3, 4
OCT is an upstream solution for industrial laser welding that enables high process flexibility, productivity, and reliability. OCT adapted to various laser processing optics guarantees precision and reproducibility of welded components by performing pre-, in-, and post-process control. Successful experience with OCT operation in automotive line production makes it favorable as a sensing technology for today’s laser processing trends. Demonstration of OCT for exact and fast localization (pre-process) of welded hairpins and the fast, quantitative post-process quality assessment of the weld bead ensures a fast welding process. Systematic studies show that the keyhole depth measured by OCT is in good agreement with actual weld depths within an average error of 9%. The quality-control accuracy of the instrument has been demonstrated during post-process testing of small circular welds with pores.
REFERENCES
1. M. Dale, Laser Systems Europe (Summer 2019).
2. N. Deyneka Dupriez, Laser Tech. J., 3, 46–49 (2018).
3. Ch. Mittelstädt, Th. Mattulat, Th. Seefeld, and M. Kogel-Hollacher, J. Laser Appl., 31 (2019).
4. M. Boley, F. Fetzer, R. Weber, and T. Graf, Opt. Lasers Eng., 129, 56-64 (2019).
Dr. Nataliya Deyneka Dupriez ([email protected]) is a technical documentation specialist with Lessmüller Lasertechnik, Munich, Germany; www.lessmueller.de.


