CHRIS GALBRAITH
Fiber lasers are the tool of choice for advanced, high-volume welding applications, serving many established sectors as well as newer, fast-growing markets. In the burgeoning e-mobility industry, the ability of fiber lasers to quickly, precisely, and consistently produce large arrays of welds is a driving factor in the improved accessibility and performance of personal electric vehicles. In other more-established industry sectors, the advantages of switching to lasers are well known. Increased yields, better design flexibility, and superior energy efficiency continue to spur the migration to modern industrial laser technology for joining of metals.
To forward-thinking manufacturers who are already harnessing the advantages of laser welding, the question of how to improve yields further and gain a step on the competition remains. Optimization of any industrial process for intelligent manufacturing requires high-quality on-line data collection. There is a steadily increasing need for technologies that can serve as the ‘eyes and ears’ of a laser welding process to enable automated and decentralized decision-making.
This need is especially clear in the context of the explosive growth of the electric vehicle sector. A typical e-mobility welding process involves more than one challenging condition: nonferrous alloys, mixed materials, and strict requirements on the mechanical and electrical performance of every joint. Additionally, the fact that large arrays of individual welds are required to produce each finished assembly leaves little margin for error. The tight welding requirements, along with the significant cost and difficulty of tearing down electrical assemblies for destructive testing, amount to a significant advantage for the manufacturer who can produce verifiable, high-quality results on the first try.
Rather than rely entirely on the open-loop nature of traditional process development and deployment—designing a robust process and then carefully controlling all the input parameters on the line to stay as close as possible to correct operating conditions—intelligent manufacturing relies on a number of technologies for gathering and sharing information in real time, providing continuous feedback on the status of every subsystem and ultimately delivering greater efficiency.
In the case of laser welding, the ability of the cell to measure and report on process conditions during production enables rapid intervention or even automatic remediation when inconsistent results arise. The benefits of this approach include better yields, reduced dependence on downstream quality assurance (and the expense and lag that come with it), and greater confidence in shipped product.
Eyes on the process
While laser welding has rapidly been adopted by industry, the sensor technologies that enable intelligent on-line decision-making have somewhat lagged behind it. A number of different monitoring technologies that can be applied to laser welding have existed on the market for many years.
One of the more common approaches is the use of photodiode sensors to measure the light that naturally radiates from a laser welding process (blackbody from the hot metal, reflected light from the welding laser, and in some cases plasma emissions) as a proxy for the stability of the melt pool and vapor channel. There are also a number of pre-process sensors (laser line scanners, camera-based seam trackers, tactile sensors for wire-feed welding) and post-process diagnostics (line scanners, surface inspection cameras, electromagnetic acoustic transducers) designed to verify that material is feeding into the weld zone correctly, and that the finished results are consistent.
There are some commonly encountered limitations with many of these established technologies. Some of them provide only monitoring as opposed to measurement of the welding process, meaning that the results they produce only work as a consistency check. That is, a monitor can tell a user that a given weld is different from a previous example shown by the user, but can’t give meaningful information about exactly how different it is, or in which ways it differs.
Additionally, most of these sensor technologies are limited to monitoring of a single metric during the weld process, when there are typically a number of parameters that must be kept in check to ensure consistent performance. In this case, monitoring multiple aspects of a process means adding bulky equipment inside the weld cell, incurring more expense, and dealing with complexity of multiple parallel systems.
Finally, none of the technologies mentioned are capable of delivering direct information about the shape of the weld pool and vapor channel below the surface of the material. This subsurface geometry is ultimately what determines the functional performance of a weld in most cases, dictating its physical strength and (crucially for certain applications) conductivity.
Getting to the root of the problem
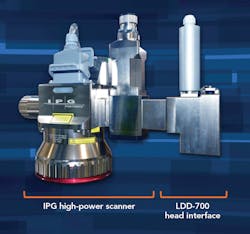
A relatively new entrant to the sensor arena, inline weld monitoring, solves a number of the long-standing challenges inherent to real-time data collection for laser welding. This novel technology uses a low-power infrared beam, delivered through the same lens as the welding laser, to take very precise distance measurements. Working during the process, this measurement beam is able to see the bottom of the vapor channel, and directly measure its depth of penetration—a defining feature of this new generation of weld measurement technology. The results contain much of the same information as a section along the length of the entire weld, but are available within milliseconds, and don’t require that the part be destroyed to get them.
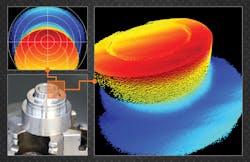
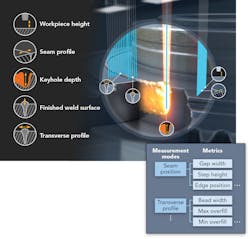
Versatility is the other key advantage. The measurement beam can be pointed ahead of the weld site to measure the material feeding in, or behind the melt pool to verify the surface quality of the finished weld. It can even be scanned to generate a 3D image of the part, facilitating setup with unprecedented ease and precision (FIGURE 1). Rapid switching between different measurement locations allows quasi-simultaneous collection of different data types. In all, five different measurement modes comprising more than 20 different metrics can be extracted from the welding process in parallel, using a single measurement system, controlled by a single software package (FIGURE 2).With such a flexible approach to laser weld measurement, the advantages of the technology vary appreciably with the application. Automotive powertrain welding processes benefit from reduced scrap costs, since welding often follows expensive machining steps and affects a substantial amount of raw material. Enhanced confidence in the quality of shipped product is invaluable for production of safety-critical components for automotive applications. In the aforementioned electric vehicle segment, the ability to reduce scrap and limit dependence on onerous destructive quality assurance streamlines intricate production processes and enables rapid scale-up of production capacity.
Fast-tracking process development
Direct imaging of the weld keyhole is not just a powerful tool for on-line quality assurance. Having eyes on the subsurface behavior of the vapor channel enables weld process engineers to iterate quickly and skip trips to the metallurgy lab in between trials. A stable process with the correct weld geometry can be narrowed in on without having to step away from the machine. This allows even experienced welding engineers to arrive at higher-quality process solutions in a shorter amount of time.
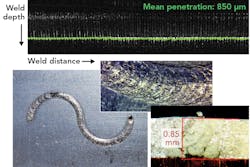
Take the example of a sophisticated weld process using remote scanning optics, beam wobbling, and a single-mode laser source to join distinct nonferrous alloys (FIGURE 4).Use of inline weld monitoring data to assess weld penetration, keyhole stability, and finished surface quality during development saves a great deal of time that might otherwise be spent exploring unproductive regions of parameter space that would yield unfavorable results upon sectioning. When the time comes to implement the process in production, the same measurement system can be used to track quality with unprecedented detail.
Looking to the future
The growing industry demand for intelligent manufacturing solutions will require greater capabilities from sensor technologies for laser welding going forward. Inline weld monitoring fulfills many of the current and projected needs of advanced manufacturers with their sights set on Industry 4.0.
In-weld penetration measurements that mimic destructive testing while providing 100% overlap with shipped product greatly enhance confidence in quality, while enabling agile and effective decision-making. Simple and flexible configuration of the measurement scheme allows a standard tool to be tailored for a given application, measuring multiple aspects of the process at the same time and collecting only the relevant information to ensure quality. Detailed imaging of process dynamics expedites development of robust laser welding solutions to meet demanding specifications. All of these capabilities will be needed to further advance laser welding processes to address the applications of tomorrow.
CHRIS GALBRAITH ([email protected]) is Applications Manager for IPG Photonics (Canada), Kingston, ON, Canada; www.ipgphotonics.com.


