Adding automated machine vision enables real-time process monitoring
DAVID GILLEN
Until recently, laser cleaning has been limited in application, yet videos of handheld laser cleaning systems generate millions of hits on the Internet. Therefore, laser cleaning is advancing and companies such as Blueacre Technology are now implementing similar principles used in medical device and semiconductor processing, where the laser process is supplemented with ancillary processes to increase process yield and reduce overall production costs.
Laser cleaning
At its most basic, laser cleaning is a process in which optical radiation is directed to a part to remove unwanted material from the surface. The surface contamination tends to be rust on steel, oxide layers on aluminum prior to welding, and coatings such as paint.
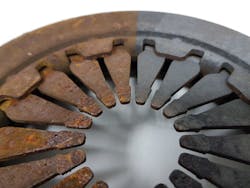
As shown in FIGURE 1, laser cleaning is very efficient at surface layer removal. Lasers used for cleaning have high power and high beam quality (M2) values, resulting in larger spot diameters and a deep depth of focus. Therefore, lasers can clean parts with multiple surfaces, each of which may be at a significantly different focal depth.
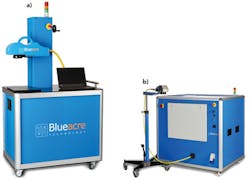
Depending on the part to be cleaned and the material to be removed, laser cleaning systems can range in power from 20 up to 1000W. Laser cleaning systems with powers of 4kW are in development and will be on the market soon. Low-power laser cleaners tend to be portable and suitable for handheld usage, whereas the higher-power laser cleaners are integrated into 24/7 production environments with a high degree of automation (FIGURE 2).
Remanufacturing is the process of returning a product to at least its original performance with a warranty that is equivalent to or better than that of the newly manufactured product. A recent study published by the EU shows a market of €30 billion in Europe, employing 130,000 people across many sectors, including aerospace, rail, and automotive.
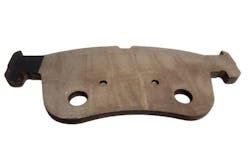
Laser cleaning is becoming a key tool in this sector because of its ability to work with multiple materials and on different platforms. As an example, FIGURE 3 shows a brake pad that has been partially laser-cleaned, allowing it to be re-dressed and sold.
Integrated machine vision
Using traditional cleaning methods such as media blasting or chemical cleaning, it is difficult—if not impossible—to monitor the process in real time. Blasting media and subsequent dust will obscure the parts and coat optics, whereas chemical cleaning is an intrinsically corrosive environment. It is also true that these processes may cause more damage to the substrate.
With laser cleaning, it is possible to integrate machine vision into the equipment and, with suitable optical filtering, inspect the parts as they are being cleaned. This makes it is possible to inspect the parts in-line to determine if they are fully cleaned or if additional cleaning passes are required. A single pass is sometimes not enough to remove the containment material, but with three or four passes, a cleaning plateau has been reached (FIGURE 4).
Although laser cleaning is highly efficient at material removal, it is not a restorative process and cannot repair defects that are on or close to the substrate surface. However, the removal of bulk surface material allows for inspection of the components post-clean. This is particularly important for component critical industries such as nuclear and aerospace, where small defects can have catastrophic implications.
Because there is no need for a secondary process to remove cleaning media, the inspection can occur either during cleaning or immediately after. Pre-developed inspection algorithms are used to detect features that are known to lead to device failure and flag these for subsequent re-work.
Laser polishing
A process that is widely coming to the forefront is laser polishing of surfaces to remove surface scratches and increase the lifetime of the component. Laser polishing heats the material until it locally melts, which allows it to flow and smooth out the surface. Like laser cleaning, laser polishing has several intrinsic benefits: it can be automated for both 2D and 3D surfaces, it is a noncontact force-free process, and there is no contamination of the part with abrasives or chemicals.
Laser polishing is therefore ideally suited to restorative work on surfaces and components that are failure-critical. The interesting point with laser polishing is that it does not require high-power lasers to produce results, and even standard 20–30W laser marking systems can be used to polish most metallic components. Many studies have found that power levels in the 50–100W range are suitable for laser polishing with high repetition rates and scan speeds.
For pulsed laser usage, the melted layer is approximately 100nm deep, whereas a continuous-wave (CW) laser can achieve a melted zone of 100μm. FIGURE 5 shows an image of a laser-cleaned part that has been partially polished with a 1mJ pulse at 30kHz. The unpolished surface is matte in appearance, whereas the polished surface is smooth and highly reflective.
As laser polishing can re-melt down to 100μm, the defects that remain post-polishing are intrinsically large and may be potential sites for failures. Laser polishing makes the inspection of such defects simpler and more amenable to automated vision systems.
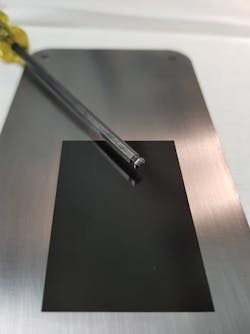
To demonstrate the effectiveness of this process, an area on a stainless-steel sheet was laser-engraved with the CE symbol (FIGURE 6). Prior to laser polishing, the surface of the stainless steel had multiple scratches and blemishes. Laser polishing of the area with the CE symbol removes all but the deepest of scratches, but the remaining defects are easier to visualize afterward. Also, as laser polishing is automated, it produces consistent results and the lighting parameters used in the vision system do not need to be altered to suit the polishing.
With the current push for Industry 4.0, the ability to inspect parts and gather data on defects allows models to be built up that can predict when and where failures will occur. This allows for a reduction in downtime and for parts to be cleaned and repaired only when required.
As laser average power continues to increase and laser cost continues to fall, processes such as laser cleaning and laser polishing will become mainstream engineering processes. They provide significant benefits in terms of reduced consumable cost, as well as being suitable for automation. Ongoing work with integrated vision systems are offering increased functionality not seen in the current market and have the potential to greatly increase their productivity.
DAVID GILLEN([email protected]) is the CEO of Blueacre Technology, Dundalk, Louth, Ireland; www.blueacretechnology.com.
Blueacre Technology, located in Dundalk, Louth, Ireland and established in 2005, develops and sells laser equipment to a range of industries, from automotive to medical devices. With both ISO 9001 and ISO 13485 accreditation, the company works in areas including laser micromachining and ablation and macro technologies such as laser cleaning and laser polishing. For more information, please visit www.blueacretechnology.com.


