Industrial manufacturing requirements for indelible direct part marking containing machine vision codes are growing exponentially. Direct part marking enables tracking a product from the time of manufacturing until the end of its useful life. This strong demand is driven by many factors including: the increasing requirements for component traceability and product unique identification (UID), the favorable economics of high-performance, lightweight engineering plastics parts replacing traditionally more expensive metal parts, and the indelible, high-resolution alphanumerics and machine vision codes it produces. Today, manufacturers are implementing strategies to establish traceability and thwart product tampering and counterfeiting. The US Department of Defense (DoD) has established MIL-STD-130M as the standard practice on military property. Beyond DoD military requirements, manufacturers of commercial industrial products ranging from automotive, packaging, and pharmaceutical to electronic and consumer goods are aggressively implementing similar standards.
Process methods
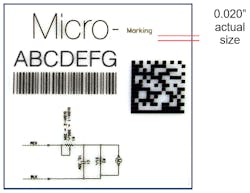
Direct part marking containing unique “unit level” identification information necessitates digital process technology such as inkjet, dot peen, and laser marking. Laser marking is the preferred method for many 3D plastic products because the process yields high-contrast indelible markings and does not require consumables or curing, thus it is less expensive. Further, lasers can mark the smallest size machine vision codes. This is important for micro-marking and when there is limited surface area on a part or component to be marked with alphanumerics, logos, or schematic diagrams. Robust Six-Sigma manufacturing operations require all products to be 100% human or machine vision readable regardless of the size and complexity details of the actual marking.
Compared to non-contact laser marking, a non-digital process like ink pad-printing cannot produce indelible marking on most plastics or unique unit level product identification traceability for security. Further, there are the expensive recurring variable costs of inks, tampons (pads), clichés (printing plates), and chemicals associated with the process. When comparing laser marking to inkjet, there are similar savings. Non-indelible inkjet cannot achieve fine-line edge resolution, which is essential for machine vision, particularly on small parts. Many industry experts believe that ˜25% of machine vision codes are misread due to poor resolution quality.
Machine-readable (vision) codes are coded information that can be interpreted through the use of optical scanners or cameras. A familiar example is one-dimensional (1D) barcode, which is a representation of information, typically dark contrast on a light background, to create high and low reflectance that is converted to 1s and 0s. The most common formats of barcodes store data in the widths and spacings of printed parallel lines (black and white stripes).
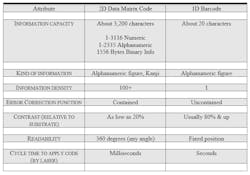
Although modern barcode schemes can contain ASCII character set, there are needs in the manufacturing sector—electronic, aerospace, automotive, pharmaceutical, etc—in which significantly more advanced machine vision codes are required. This continuing drive to encode more information in combination with smaller space requirements has led to the development of 2D data matrix codes. Data matrix codes cannot be read by a laser (used in barcode) as there is typically no sweep pattern that can encompass the entire symbol. They must be scanned by a camera capture device. 2D data matrix is the revolutionary machine-readable code specifically designed to address the limitations of barcodes. Figure 1 demonstrates the differences between 2D data matrix and barcode.
A data matrix is a machine-readable 2D symbol capable of storing a large amount of information within almost any physical size. Data matrix symbols are capable of carrying 25—100 times more information than the typical barcode, and the mark size is limited only by the resolution of the laser. Data matrix codes are designed to survive harsh industrial environments and they require only 20% contrast, which is significantly less than 1D barcodes (typically 80% and greater). It is possible to read dark codes on dark backgrounds and light codes on light backgrounds. Built-in error correction (ECC) provides safeguards and capabilities for handling poorly printed or damaged symbols, and codes allow omni-directional reading from any angle.
Comparisons
2D data matrix codes are ideal for small parts marking and are designed to survive harsh industrial environments. The size of data matrix codes is only 1/10—1/100 of a barcode given equal encoded data. Thus, very little space on a part is needed to contain significant manufacturing data for product traceability. Every code is about half black and half white, resulting in a 50/50 chance that cell damage will not harm readability. Data matrix’s high degree of redundancy (data is scattered throughout the symbol) and resistance to printing defects make it highly reliable. Error correction, built into the algorithm, provides safeguards and capabilities for handling poorly printed or damaged symbols.
The table summarizes differences between 2D data matrix and 1D barcode.This article focuses on using laser technology to mark 2D data matrix codes on 3D plastic manufactured component parts and assemblies (including acetals, nylons, polyolefins, polycarbonates, polyesters, styrenics, etc.). These types of plastics are chemically inert and non-polar with low surface energy. For direct part marking of plastics, lasers offer many advantages over ink-based processes due to their emission wavelength, power performance, and versatility. This results in faster marking speeds, higher quality, and greater production.
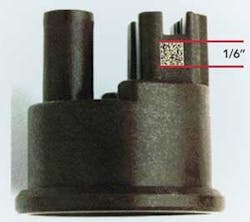
An excellent application example is 2D data matrix codes applied via laser marking to harsh environment under-hood automotive fuel components and assemblies (typically acetals, nylons, and polyesters). Figure 2 shows 2D data matrix for unit level traceability and product security. The 1/6 in. size code is marked in about 200ms. Data contained in the code includes full traceability of the component part (resin batch, mold-machine, date-shift-time, and assembly leak test).According to an industry expert and independent analytical analysis of VectorJet laser marking, this new technology yields individual data matrix cell sizes of 0.0056 in. and smaller that are produced precisely on plastic surfaces (roughly the size of a human hair). Normally lasers overburn (or overprint) these tiny data cells when they are forced to make them very small. There is usually a heat-affected zone surrounding the mark (or data cell) that can affect readability because the heat of the laser cannot be precisely confined in small areas. VectorJet solves these problems.
Modern machine-vision systems are not just standalone inspection devices. Rather, they are integrated into Six Sigma total manufacturing operations including statistical quality control metrics programs. Advanced systems contain artificial intelligence, which further expands the realm of lasers and machine-vision codes. The powerful combination of laser marking is seen as critical to success by providing process feedback and error prevention for products with nearly zero defects.
Conclusion
Industrial manufacturing requirements for indelible direct part marking containing machine vision codes are growing exponentially. The US DoD has MIL-STD-130M as the standard practice on military property. Beyond military requirements, manufacturers of commercial industrial products ranging from automotive, packaging, and pharmaceutical to electronic and consumer goods are aggressively adopting similar standards. Direct part marking enables unit level tracking of a product from the time of manufacturing until the end of its useful life. The powerful combination of laser technology and machine readable vision codes enables absolute product authentication, track, and trace. This is invaluable in the production process, distribution chain, and to end users and consumers.


